Get Glo Bis 3GB of 1K and Enjoying Surfing with Your Android Phones and PC

Make sure you subscribe to it on a blackberry phone, Use it to browse with that blackberry for some minute before you remove the SIM, Then Insert that SIM to your Android phone. Configure the APN of your Android phone with blackberry.net and activate it as your default setting. Switch on your data connection (H won't display yet). Off your Android phone again and remove the SIM (make sure the APN is set to blackberry.net ). - See more at: http://www.360techgates.blogspot.com/2016/05/get-glo-bis-3gb-of-1k-and-enjoying.html#sthash.WXQSFoo4.dpuf

How to Control the Windows Desktop With an Xbox or Steam Controller

If you have your PC set up as a living room gaming PC and media center, why use a mouse for everything when you could just use your game controller? By default, Xbox controllers work well with many PC games, but it won’t allow you to navigate the desktop and play something from Netflix. But with some third party software, you can use an Xbox 360 or Xbox One controller as a mouse and keyboard. If you have one of Valve’s Steam... - See more at: http://www.360techgates.blogspot.com/search/label/Gaming#sthash.OcCTFaFV.dpuf

How to Play DVDs and Blu-rays on Linux

How to Play DVDs and Blu-rays on Linux Commercial DVDs and Blu-ray discs are encrypted. The Digital Rights Management (DRM) is designed to prevent you from ripping them, copying them, and watching them on unsupported players. - See more at: http://www.360techgates.blogspot.com/search/label/Learn%20Hack#sthash.J8yncvsL.dpuf

Get 1000+ twitter followers In a Day

To my surprise there are some people who may not know that don't know how to get more followers on twitter,like 1000+ followers in a day but i will teach you today how to get more followers non-chalantly as long as you have an internet connection you are good to Go.

How to Install an Android OTA Update Without Losing Root

Over-the-air updates have long been the bane of many rooted Android users’ existences. It’s an endless battle: installing the update breaks root or won’t flash at all, but everyone wants the latest version of their mobile OS. Thanks to a new tool called FlashFire, the struggle may be over.

Showing posts with label Computer tips. Show all posts

How to Restore Files From a Windows Backup on a Mac

Need a file from an old Windows backup on your Mac? Macs can read Windows drives, but Time Machine won’t help you recover files from a Windows backup. You have to extract files from the backup manually, and it’ll take a bit of work.
We’ll cover three different types of Windows backups here: File History backups created with Windows 10 or 8, Windows Backups created with Windows 7, and System Image Backups created with either.

Restore Files from File History on Windows 10 and 8


You can actually just browse this folder and extract your files. You’ll find them under
FileHistory/USERNAME/COMPUTERNAME/Data/. For example, if you want to recover files that were stored in your Documents folder, browse toFileHistory/USERNAME/COMPUTERNAME/Data/C/Users/USERNAME/Documents in Finder.If you have a File History backup, you’ll see a “FileHistory” folder on the external drive containing the backup when you connect it to your Mac. Just connect the external drive to your Mac, open a Finder window, and view its contents.
This may sound a bit complicated, but it’s really not. There shouldn’t be many other folders getting in your way, so you can just poke around inside the FileHistory folder until you find the files you want to restore to your Mac.

Restore Files from Windows Backup on Windows 7


If all you have is a Mac with OS X, though, plug the drive into your Mac and open it in Finder. You’ll see a folder named after the name of the computer it was created on. Inside that folder,  you’ll see at least one “Backup Set” folder, “Catalogs” folder, and “MediaID.bin” file.
Warning: We really don’t recommend restoring a Windows 7 backup in this way. It won’t preserve your directory structure, and you’ll have trouble finding the files you’re looking for. It would take forever to restore a large amount of files in this way, but if you’re desperate, this method will work. If you have a Windows 7, 8, or 10 PC lying around, though, using it would be a much better option. You’ll be able to restore the files from the backup, and then you can copy them to a USB drive and move them to your Mac. You may even want to consider installing Windows 7, 8, or 10 in Boot Camp.
The Backup Set folders contain your files. Choose the one with the date you want to restore files from–probably the most recent backup. Inside it, you’ll find a “Backup files” folder. Inside that, you’ll find multiple “Backup files” .zip files.
The Windows Backup tool on Windows 7 actually stores your files inside .zip files. However, each “Backup files” folder is an incremental backup. The first folder contains the first backup, and then the second folder contains only files that are new or have been changed.
You may wish to copy the “Backup files” .zip files to your desktop or somewhere else on your Mac, and then double-click them to extract them. The files you get will be a mess–rather than be inside folders, they’ll be named after the folder. However, if you dig enough, you should be able to find the important files you’re looking for.

Restore Files from System Image Backups

If you have a system image backup on a drive, you’ll have a “WindowsImageBackup” folder and a “MediaID.bin” file.
Even on Windows, it’s not possible to restore individual files from a backup without doing it by hand. These files are stored in Microsoft VHDX virtual hard drive image files. Mac OS X can’t normally access them.
To gain access to these files, install Paragon’s virtual disk mounter application. It’s called “Paragon VMDK Mounter,” but it can also mount other types of disk image files. You’ll have to provide your email address to register, but the application is otherwise completely free. After the disk image is “mounted,” you’ll be able to browse it and extract files.
Once it’s installed, you can open Paragon VMDK Mounter and navigate to the VMDK file you want to mount at WindowsImageBackup/COMPUTERNAME/Backup [date]/[something].vhdx. You can also just double-click the .vhdx file in Finder.
You may see multiple VHDX files. Each represents a single different hard disk partition. You probably want to open the largest hard disk partition, which will be your system drive in most cases.
If the .vhdx file is on an external drive formatted with Microsoft’s NTFS file system, you’ll need to copy the .vhdx file to your Mac or an external drive formatted with another file system before continuing. Macs can’t write to NTFS drives by default, and this causes an error when mounting the image with Paragon’s tool.
After it’s mounted, you’ll find it under “Devices” in the Finder’s sidebar. You can browse the files inside the image and extract whichever files you’d like. For example, you’ll find your user account’s directories at Users/NAME inside the image.

You can also extract files from a Time Machine backups on Windows, if you need to. However, it’ll usually be easier to restore the files with the operating system’s official restore tool and copy them to a removable drive before moving them between operating systems.

Why Windows 10 Is Saying “Your Location Has Recently Been Accessed”

Applications can use Windows 10’s location services to view your physical location. You’ll see a system tray icon that reads “Your location has recently been accessed” or “Your location is currently in use” when this happens, and it can get a little annoying.
If you don’t like this, you can disable location access entirely, control which applications have permission to view your location, or just hide the icon so it doesn’t keep reappearing and distracting you.

How and Why Are Apps Viewing My Location?

Apps use location services to discover your physical location. For example, if you open the Mapsapp included with Windows 10, it will access your location and display it on the map. If you open the Weather app, it can access your location and display the weather in your area. Cortanaaccesses your location and uses it to display relevant information. The Camera app can access your location to add geolocation information to photos you take.
If you have a Windows tablet, it may have a GPS hardware sensor, and Windows can use that to find your location. However, Windows can also use the names of nearby Wi-Fi networks along with data from a Wi-Fi network database to triangulate your location. This is how Windows 10 will find your location on most computers without GPS sensors. Both Google’s Android and Apple’s iOS can also track your location in this way.
This particular message will only appear when apps are accessing your location via the Windows location services platform. This mainly includes apps that come with Windows 10 and apps you download from the Windows Store. There’s nothing stopping traditional Windows desktop apps from accessing your location with this service, but most don’t. Google Chrome, for example, uses its own location services feature. You won’t see the Windows Location icon when you give a website access to your location in Chrome, as Chrome is accessing the list of nearby Wi-Fi networks directly and determining your location with Google’s own location services platform.

How to Prevent Your Location From Being Accessed

If you’re fast enough, you can click the location icon that appears in your notification area and select “Open Location Privacy Settings.” However, we’ve found that the “Your location has recently been accessed” icon can quickly vanish.
Thankfully, you can also access this settings screen normally. Open the Start menu and select “Settings.” Navigate to Privacy > Location in the Settings app.

To disable location access for all user accounts, click the “Change” button and set the “Location for this device” slider to “Off.” To disable location access for just your user account, just set the Location slider under the Change button to “Off.”
There are two ways to disable location services here. You can disable location services for all user accounts on your Windows system, or for just your specific user account.
Even if you disable location access here, some built-in Windows 10 services will still be allowed to access your location. In particular, the Find My Device and Wi-Fi Sense features will still have access to your location, if you have them enabled. Windows desktop applications that use other methods to access your location can continue to do so.

How to Control Which Apps Can Access Your Location

If you’re fine with apps accessing your location, but want to block certain apps from doing so, you can. Head to the Settings > Privacy > Location screen in the Settings app. Scroll down to the bottom of the screen and you’ll see a list of apps that can access your location. Set apps to “Off” and they won’t be allowed to access your location.
Remember, this only controls apps that use the Windows location platform to access your location. For example, Google Chrome can still provide your location to websites that request it. You’ll have to disable these other geolocation features in each individual app’s settings–for example, you could disable location access or manage the list of websites that can access your physical location from within Google Chrome.

How to Hide the Location Icon

If you don’t mind apps accessing your location but would rather the “Location” icon go away so you don’t see it all the time, you can just hide the icon.
Open the Settings app from your Start menu and navigate to System > Notifications & Actions. Click “Select which icons appear on the taskbar,” and scroll down to the “Location Notification” option in the list. Switch it to “Off”. It’ll be hidden behind the arrow in your notification area, like many other system tray icons are.
You can also check the “Turn system icons on or off” option from System > Notifications & Actions. If you disable Location there, it’ll disappear entirely, instead of hiding behind the little arrow on your taskbar. However, on our machine, that option was grayed out, so your mileage may vary. You may have to just settle for hiding it.

You may also see a similar icon on Windows 7, 8, or 8.1. These used previous versions of Windows location services. On Windows 8, you can control the list of apps that have access to your location in PC Settings. On Windows 7, you can open the Start menu, type “sensors” into the search box, launch the “Location and Other Sensors” tool that appears, and use it to disable location access.

How to Reset Windows 10’s Screenshot Counter

top
When you take a screenshots in Windows 10 with the Windows+PrtScn shortcut, it automatically saves those pictures by naming them “Screenshot (1),” “Screenshot (2),” and so on. Even if you delete screenshots, that counter just keeps going up. You can use a quick Registry hack to reset that counter whenever you want.

C:\users\<username>\Pictures\Screenshots
We’ve covered how to take screenshots in Windows 10 using various shortcuts already. For the purposes of this article, we’re talking about shortcuts you take with Windows+PrtScn. Those are automatically saved to a file in a Screenshots folder inside your regular Pictures folder. By default, that’s going to be at:
This process should not be necessary with other screenshot tools, even those built-in to Windows.

Reset the Screenshot Counter by Editing the Registry Manually

If you take a lot of screenshots throughout the day, particularly for different projects, it can be helpful to reset the counter for the saved files. And you’ll do that using a simple Registry hack.
Standard warning: Registry Editor is a powerful tool and misusing it can render your system unstable or even inoperable. This is a pretty simple hack and as long as you stick to the instructions, you shouldn’t have any problems. That said, if you’ve never worked with it before, consider reading about how to use the Registry Editor before you get started. And definitely back up the Registry (and your computer!) before making changes.
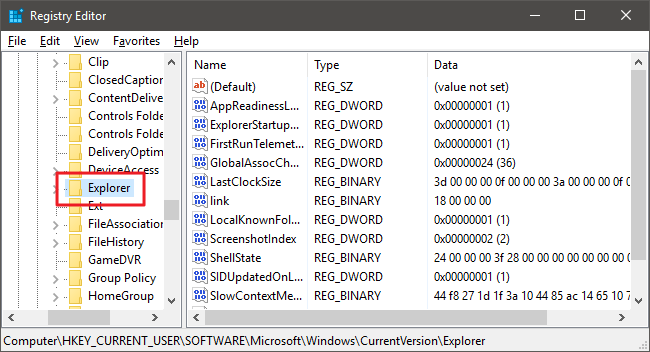
To get started, open the Registry Editor by hitting Start and typing “regedit.” Press Enter to open Registry Editor and give it permission to make changes to your PC. In the Registry Editor, use the left sidebar to navigate to the following key:
HKEY_CURRENT_USER\SOFTWARE\Microsoft\Windows\CurrentVersion\Explorer
Explorer_Key
Next, scroll through the right-hand side and locate a value named ScreenshotIndex.
ScreenshotIndex_Value
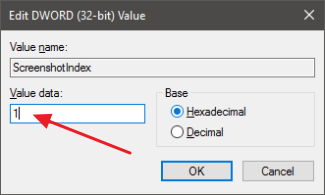
Double-click ScreenshotIndex to open it up and set the “Value data” box to 1 (or to any number at which you want to start numbering your screenshots).
Screenshot_value_data
Click OK and exit Registry Editor. Screenshots should start numbering at the index value you set. If you still have some screenshot files in the folder, don’t worry. Windows will adjust for this and skip over any numbers that are already present.

The Quick Method: Download Our One-Click Registry Hack

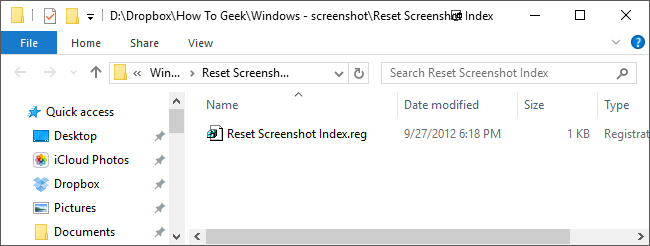
reghacks
If you don’t feel like diving into the Registry yourself every time you want to reset the counter, we’ve created a downloadable registry hack you can use to reset your screenshot counter to 1. It’s included in the following ZIP file. Extract it somewhere safe, then whenever you want to reset the counter, just double-click the Reset Screenshot Index REG file and click through the prompts. It’s a handy way to quickly reset the counter without firing up Registry Editor.
Reset Screenshot Index

And there you have it! The screenshot counter is just a small annoyance to some folks, but a super easy one to fix.
This hack is really just the Explorer key, stripped down to the ScreenshotIndex value we described above, and then exported to a .REG file. Running the hack changes the value for ScreenshotIndex to 1. And if you enjoy fiddling with the Registry, it’s worth taking the time to learn how to make your own Registry hacks.

How to Clear Your Browsing History in Firefox

Like other browsers, Firefox collects a detailed history of your internet adventures. If you want to cover you tracks, or don’t want Firefox to collect any data at all, you can make changes to ensure a more private browsing experience.
You can access Firefox’s history from the aptly-named “History” menu on OS X, or by clicking the three lines in the upper-right corner on Windows and selecting “History” (“Control + H”).
Not only will the History menu display recently visited websites, but also recently closed tabs and windows. You can also display tabs from other devices and restore a previous session.
The items of most interest to us however, are the options to “Show All History” and “Clear Recent History…”.
When you select “Show All History”, you will see your entire browsing history laid out in a windowed list.
If you want to delete any of these websites from your history list, you can select one at any time and hit the “Delete” button. If you want to delete everything, then use Command+A on OS X or Ctrl+A on Windows. If you want to select several sites at once, use the “Command” key (OS X) or “Control” (Windows) to select each site you want to remove from your history.
The fastest way to clear your history is to select “Clear Recent History…” from the History menu, which will give you a dialog to choose the history time range you want to clear. You have the option to clear the last hour, two hours, four hours, today, or everything.
Click “Details” and you can choose far more than your browsing and download history. You can also clear out stuff like your cookies, cache, active logins, and more.
If you want to set up special options for your browsing history, you need to open Firefox’s preferences and select the “Privacy” category. In the Privacy settings, there is a section devoted entirely to History. In the following screenshot, we’ve selected the option to “use custom settings for history”.
If you decide to always use private browsing mode, then your browsing history, cookies, and other items will not be saved. You can also elect to not record your browsing and download history, search and form history, or accept cookies. If you don’t want to accept third-party cookies, the option is there if you elect to enable it.
Finally, if you want your browsing history to clear whenever you close Firefox, you can select that option and then click “Setting…” to choose exactly what is cleared when Firefox shuts down.
It’s important to remember that, clearing some of these items affect later browsing sessions. For example, if you clear active logins, you will have to log back into any sites from your previous session. Similarly, if you clear out your cookies, your login sessions will be deleted and you will have to reenter your credentials.
When you choose the option to clear your browsing history upon shutdown, Firefox won’t give you any warnings, so it’s important to remember that you’ve selected the option in the first place. Otherwise, you may wonder why you’re always being logged out your favorite social media sites or why your recent browsing history is always gone.
Clearing your history and other private data is one of the best privacy practices you can undertake. Firefox is unique in that it has the option to clear this stuff every time you shut it down, so if you’re particularly privacy-conscious, such as if you use Firefox one a work or publicly used computer, then this is a great option to enable

.

How to Upgrade Your Outlets for USB Charging

When you have more than one or two gadgets, the outlets near that kitchen counter can get very cluttered. If you want to clean things up, you can upgrade your outlets to support not just standard 120-volt power cords but 5v USB charging too.

Why Would I Want To Do This?

USB is now the ubiquitous standard for charging smartphones, fitness gadgets and everything in between. Further, all the gadgets we use are increasingly power hungry and we spend a lot of effort ensuring they are fully charged and nearby.
If you have a location in your home or office where you frequently chew up a few outlets with charging devices, you might prefer to upgrade the outlet to support USB charging. With an upgraded outlet, you can use both 120 volt outlets for non-USB devices (like a nightstand lamp or the TV on your kitchen counter) as well as charge multiple USB devices. It’s a great no-clutter way to charge your devices without busting out a power strip, sacrificing use of the outlet, or taking up counter space with a full charging station.

If you like the idea of streamlining your USB charging but you can’t perform the upgrade yourself, don’t want to pay an electrician to do it, or you’re a renter or apartment dweller who can’t change the wiring of your home, you should definitely check out
 our guide to USB charging stations–it’s all the USB charging goodness without any risk of electrocution.For readers who are handy and familiar with basic electrical wiring safety precautions, it’s a trivial task to swap out a standard 120v wall outlet with a 120v wall outlet + USB charging. For readers who aren’t comfortable doing their own electrical work, we highly recommend getting a qualified electrician to perform the upgrade for you.

How to Select An Outlet Upgrade

Although combination 120v/USB outlets were a complete curiosity even a few years ago, you can now find them everywhere from online retailers to big box home improvement stores in a wide variety of styles, shapes, and configurations.
There are so many on the market, in fact, that it can be a bit bewildering to pick through them all and decide which to select. Let’s take a look at some basic considerations to ensure you get not only the right outlet for your needs, but one that will keep you and your gadgets safe.

Safety First: Buy Name Brand UL-Rated Products

We’re going to echo a sentiment we’ve emphasized in other articles, including our recent USB charging station guide: safety matters. When it comes to buying something like an iPhone case, a cheap $10 knock-off may be fine. When it comes to equipment that connects directly to the electrical mains of your home, however, cheap knock-off equipment can, at best, damage your gadgets and, at worst, kill you.
With that in mind, we cannot encourage you enough to look at safety certifications. You should expect to pay anywhere from around $20-$40 for an outlet upgrade, and and we recommend you either purchase the outlets in person at a local retailer or purchase UL-rated and favorably-reviewed outlets from reputable online retailers like Amazon. This Top Greener dual outlet/dual USB outlet ($20) is a perfect example: it’s UL-rated, very well reviewed, and has high-amp charging on both ports.

Amps Matter: Get Enough Juice for Your Gadgets

We mention amps a lot when talking about USB-related topic, and with good reason. Whether you’re talking about battery packs or wall chargers, the amount of amperage a charger can put out determines how quickly you can charge your devices. A lightweight 1A connection might be fine for topping off your Kindle, but it’ll take much longer than a 2A connection to charge your iPad (and in some cases certain high-demand devices just don’t charge correctly with low-amp chargers).
When shopping for a USB charging outlet, look for the amperage rating for the USB outlets. The outlet itself will have a 15 amp rating, but this is for the 120v AC side of things, not the 5v DC system that charges the USB devices. If the company does not specify the individual amperage per port (e.g. “2A per USB port”)  then divide the total listed amperage across all the ports (e.g. the amperage listing is 4A and there are 2 ports therefore each port can draw 2A).

Port Numbers: Dual Use vs. Dedicated Outlet

USB charging outlets come in two flavors: 120v outlets + USB ports, and all USB ports. In the former, you can use both standard plugs and USB plugs, and in the latter the entire outlet becomes dedicated to USB charging. We recommend against going with a totally dedicated USB outlet unless you have a compelling reason to do so.
The typical configuration for dual use dual is to squeeze the USB ports into the empty space between the two 120v outlets as seen above on the left. Rarely, outlets are configured with two USB ports on the top and a single power outlet on the bottom, seen in the middle above. Finally, dedicated USB outlets devote the entire face of the outlet to USB charging and offer 4 ports, seen above right.
Unless you happen to have a situation with abundant outlets (like a modern kitchen with outlets spaced all over the counter back splash) it doesn’t make a lot of sense to convert an outlet to a purely USB charging station.

Physical Size: The DC Transformer Goes Somewhere

Our final consideration is the size of the replacement outlet. Standard outlets are very skinny (only about as deep as your thumb is wide). Upgraded outlets with integrated USB charging are much thicker.
In the photo above you can see how the USB-enabled outlet on the left is roughly twice as thick as the standard outlet on the right. What you lose on the outside of the outlet (all those clutter-creating USB chargers), you essentially shift to the guts of the outlet by packing the AC-to-DC transformer into the outlet box.
In newer homes (or older homes with upgraded electrical systems) this shouldn’t be any issues at all as modern outlet boxes are deep enough–it’s a tight but not unmanageable fit. In older homes with shallower outlet boxes, you’ll need to replace the old in-wall box with new one to accommodate the bulky upgrade.

How to Install Your USB Outlet

Again, before proceeding, we want to emphasize that this is a project for a confident DIYer. There’s no shame in getting someone else to do the actual wiring for you if you lack the skill or knowledge to do so. If you read the beginning of this article and immediately visualized how to do it based on past experience wiring switches and outlets, you’re probably good. If you opened the article not sure how exactly we were going to pull this trick off, it’s time to call in that wiring-savvy friend or electrician.
With that in mind, let’s jump right into the straight forward process of replacing and outlet.
For the purposes of this article we constructed a mock (but operational) electrical wiring setup using some scrap wood and basic electrical components, seen above. This setup is identical to what you’d find in a modern home (sans the drywall of course).

Step One: Turn the Circuit Off for Safety

The very first order of business is to disable the electrical circuit you are working on by turning off the circuit at the electrical breaker box. If you don’t know which circuit a particular outlet is on because the labeling in your breaker box is missing or ambiguous, you can always turn off the whole-house circuit breaker.
Confirm, at the outlet level by plugging in a lamp or outlet tester, that the electricity is off before proceeding and instruct everyone in your residence that you are working on the outlet and the electrical panel is not to be touched.

Step Two: Remove the Old Outlet

Now that we know everything is safe, the next step is removing the old outlet. The most important part of this step is paying close attention to how the wiring was attached to the old outlet. Digital cameras are your friend: grab your camera or smartphone to snap pictures of the process in case you need to jog your memory.
Remove the faceplate with a screwdriver, and then unscrew the longer screws holding the actual outlet into the box. At this point your setup should look more or less like the photo below.
The way your wiring is attached to your outlet can vary based on the outlet design. Some outlets have side screws, some have side screws with little clamping plates, and some outlets even have a peg-style system in the back where the wiring is inserted straight into the outlet. Using a screwdriver, carefully release the pressure on the wiring and remove the outlet from the box.
At this point you should have a setup similar to the one see above. At minimum you should have a hot wire (black), a neutral wire (white), and ground wire (green or bare) but you may have two sets of wires if the outlet is in the middle of a series.
Depending on the style of box, the ground wire will either be part of the wire bundle (for plastic boxes) or a small separate wire grounded directly to the box (for metal boxed/cabled outlets where the box itself is part of the ground). As a side note, if you do not have a ground wire in your box (either as part of the wiring bundle in a plastic box or wired directly to a metal box) please consult with a qualified electrician to get your outlets properly grounded.

Step Three: Install the New Outlet

If you’ve made it this far, the final step is the easiest: you just reverse the whole process, but with the new outlet.
Reattach all the wires to your new outlet. The black wires attach to the brass screws, the white wires attach to the silver screws, and the ground wire attaches to the green ground screw. In the photo below, taken midway during the installation process, you can see that we have attached the black-to-brass, the white-to-silver, and are about to attach the ground wires to the green screw located on the bottom of the outlet box.
Once you have properly attached the wires and there is no cross connection between any bare wires of mismatched colors (e.g. bare white can touch bare white but the bare ground wire should not be touching the white or black exposed wire or terminals), gently push the outlet back into the outlet box and snug it down using the outlet screws.
Reattach an appropriately sized outlet face plate (you’ll note that we had to replace our two-hole outlet plate for a large single-hole rectangular plate to match the new outlet) and you’re in business. Plug in your USB cable, attach your device, and wall-wart free charging is at your fingertips.

How to Use Windows’ File History to Back Up Your Data

File History is Windows 10’s main backup tool, originally introduced in Windows 8. Despite the name, File History isn’t just a way to restore previous versions of files–it’s a fully-featured backup tool.
After you set up File History, you can just connect an external drive to your computer and Windows will automatically back up your files to it. Leave it connected and Windows will back up automatically on a schedule.

How to Enable File History


Click or tap the “Add a drive” option under Back up using File History to add an external drive that File History will back up to. It’ll list external drives and give you the option to back up to them.
File History is designed to be quick and easy to enable, unlike other complex backup tools. To enable it, first connect an external hard drive to your computer. Next, open the Settings app from your Start menu. Navigate to Update & Security > Backup.
You could also use the Control Panel for this, but we’ll be covering the new Settings interface here. If you’d like to use the Control Panel instead (for example, if you’re still on Windows 8), open the Control Panel and navigate to System and Security > File History.
Select a drive, and Windows will use it for File History. The “Automatically back up my files” option will appear and be automatically turned on. Windows will automatically back up your files to the drive whenever you connect it to your computer.

How to Configure File History

Select “More options” to configure how often File History backs up, how long it keeps those backup copies, and–most importantly–which files it backs up.
File History automatically backs up your files every hour by default, but you can select a different time here. You can choose once every 10 minutes, 15 minutes, 20 minutes, 30 minutes, 1 hour, 3 hours, 6 hours, 12 hours, or once per day.
It will normally keep your backups forever, but you can have it delete them when they become one month, 3 months, 6 months, 9 months, 1 year, or 2 years old. You can also have File History automatically delete backups as necessary to make space on your File History drive.
By default, File History will be set to back up back up important folders in your user account’s home folder. This includes the Desktop, Documents, Downloads, Music, Pictures, Videos folders. It also includes the Roaming folder where many programs store application data, your OneDrive folder, and other folders.
You can check the full list of folders in this window, and add more folders. Select “Add a folder” and you’ll be able to choose any folder on your computer to back up. You can also select a folder here and use the “Remove” button to prevent Windows from backing it up.
NOTE: In Windows 8, you do not have the option to add folders from File History–instead, you must add folders to a Library in order for them to be included.
You’ll also find an “Exclude these folders” section that allows you to exclude specific subfolders from being backed up. For example, you could have Windows automatically back up every folder in your Documents folder, but ignore one particular folder. In Windows 8, you’ll find this on the left-hand side of the File History window.
To start backing up to a different drive, use the “Stop using drive” button. This allows you to stop backing up to your current drive and start backing up to a new one. The backups won’t be deleted, but Windows can only be configured to back up to one drive at once.
The “See advanced settings” link here takes you to the Control Panel, which offers another interface you can use to configure File History. Click “Advanced Settings” here and you’ll find a few more options, including the ability to view recent errors in the Event Viewer, clean up old versions of files, and allow other computers that are part of your homegroup to back up to your drive.

How to Restore Files from Your Backup

To restore files from your external drive, open the Settings app, select “Update & security,” select “Backup,” select “More options,” scroll down to the bottom of the window, and select “Restore files from a current backup.”
You can also open the Control Panel, select “System and Security,” select “File History,” and click “Restore personal files.”
(If you have File History backups you created on another computer, just set up File History on the new computer and select the drive containing your old File History backups. They’ll then appear in the Restore Files interface so you can restore files, just as you could if the backup was created on the current computer.)
This interface will allow you to view your backups and restore files. Browse the available files and select one or more files or folders. You can preview them by right-clicking them or select them and click the green button to restore them to your computer.
To choose a time period, click the arrow buttons or the panes at the side of the window. You’ll also be informed how many different backup time periods are available. For example, in the screenshot below, the “2 of 3” at the top of the window indicates there are three available backups, and we’re viewing the second one. There’s one older backup available, as well as one newer one.

How to Restore Files From Within File Explorer

You can also quickly restore a previous version of a file from File Explorer. Open File Explorer, right-click the file you want to revert, and click “Restore previous versions.” You can also click “Properties” and then select the “Previous Versions” tab.
Any available previous versions of the file from File History will be available here. You can preview them, restore one to its original location, or restore a previous version to a different location on your computer.
You can also view previous versions and deleted files that were in a specific folder. To do this, navigate to the folder in File Explorer, click the “Home” tab on the ribbon bar at the top of the window, and click “History.”
You’ll be presented with a list of files you can restore that were once in the folder. This is the same interface you’d use when restoring files normally, but File Explorer allows you to start from within a specific folder to speed things up.

File History is a very simple and useful backup option, and for it’s completely free. Windows 10 also allows you to create a system image backup if you want a full backup copy of your operating system state. This isn’t the ideal solution for backing up your files–even if you make system image backups, you should be creating more frequent backups of your important files with File History–but some geeks may find it useful if they’re playing with the Registry or other system files.

How to Set Up and Customize Email Accounts in Windows 10


Windows 10 comes with a built-in Mail app, from which you can access all your different email accounts (including Outlook.com, Gmail, Yahoo!, and others) in one single, centralized interface. With it, there’s no need to go to different websites or apps for your email. Here’s how to set it up.

Setting up Mail From Other Accounts

Mail supports all the most popular mail services, including Outlook, Exchange, Gmail, Yahoo! Mail, iCloud, and any any account that supports POP or IMAP. Click the Mail tile to start the app, and press the “Get Started” button. If you’re logged into your Microsoft account, the app should already have your outlook.com email address in the list. Click the “Settings” icon in the lower left-hand corner, or swipe in from the right edge of the screen, and then tap “Settings.” From the right sidebar go to Accounts > Add Account.

The “Choose an account” window will appear. Mail comes ready with all kinds of popular email services. Choose the type of account you want to add and follow the on-screen instructions. If your settings are correct, then you’ll jump directly to that account’s inbox, ready to start processing mail. If you’ve set up more than one account, you can switch among them by selecting “Accounts” in the top left corner.

Link Multiple Inboxes Together

In Mail, you can link your inboxes together, so you can see all the messages from all your accounts in one unified inbox. Point your mouse to the lower-right of the screen and click “Settings.” From the right sidebar, click “Manage Accounts > Link inboxes.”

A pop-up box will open. Now, simply choose the accounts you want to link and give the new linked inbox a name.

Customize Your Mail Experience

Click the Settings button in the lower right-hand corner of the screen, or if you’re on a touch device, swipe in from the right edge and then tap “Settings.” There are two kinds of settings in Mail: those specific to an account, and those that apply to all accounts. Settings that apply to all accounts let you tweak the entire aspect of your Mail experience, including personalization and reading options.
Go to Settings > Personalization in the right sidebar. Here, you can pick from a collection of 10 different hues or use the Windows accent color for seamless integration. You can toggle between the light and dark theme and set the background to cover the entire window or just the right pane where you read new messages and compose new mails. To add your own background picture, click “Browse” and select any picture stored in your PC.

For more functional customization, click on Settings > Reading in the right sidebar to manage your day-to-day mail reading experience. For example, Caret Browsing in Mail lets you navigate the reading pane with your keyboard cursor. You can use the arrow keys, Page Up/Down to scroll, and press Home or End to jump to the beginning or the end of a message.
You can toggle “Auto-open next item” on or off to indicate what you want to do when you delete a message—move to the next message, or go back to your background picture. Mail also lets you decide when a message is marked as read:
  • When selection changes (that is, when you choose another message)
  • Don’t automatically mark item as read (you have to mark it as read manually)
  • When viewed in the reading pane (it makes Mail flag a message as read only after you’ve had it open for a certain number of seconds)

If you have more than one account in Mail, then you can tweak certain settings on a per-account basis. In the settings menu, these can be tweaked for each individual account:
  • Quick Actions: Also known as Swipe Actions, this lets you operate on a message in the list by dragging your finger left or right across it. Swiping right marks the message as flagged and to the left archives it. However, you can customize what that right swipe and left swipe will do (or turn off swipe action feature entirely). You can set or clear a flag, mark a message as read or unread, archive, delete, or move.
  • Signature: This lets you create and add an email signature to all the messages you send from a particular account.
  • Conversation: Grouping messages by conversation is turned on by default, and groups all messages that have the same subject into one thread.
  • Automatic Replies: Available on Outlook and Exchange accounts only, you can turn this on to send automatic replies to people when you know you’re not going to see your emails for a while.
  • Notifications: Windows will let you know when a new message arrives for a particular account. Turn on “Show in action center,” and then specify how you want to be notified–with a sound or a banner. You can customize notifications for each email account separately as per your needs.
  • Automatically download external images and style formats (available in the Reading section): Decide whether you want Mail to automatically download images. If you turn this off, you can choose to download external images in messages as you read them.

You can also pin one account’s inbox or any other mail folder to your Start menu for instant access and efficiency. For example, if you have a folder called Important, you might want them pinned on your Start menu. Right-click the folder you to pin, and choose “Pin to Start.” Click that pinned folder and you’ll be taken straight to that folder.

Customize How Your Accounts Download Messages

Lastly, you can go into each account’s individual settings to tweak how it downloads new messages. Go to Settings > Manage Accounts and click on an account to edit it. You can change its name or delete the account, but most important here is the “Change mailbox sync settings” section, which includes:
  • Download new content: This menu lets you choose how frequently the Mail app will check for new messages. Usually “As items arrive” is what you want. Some account types offer only “Every 15 minutes,” “Every 30 minutes,” and so on, if you’d rather not be inundated with notificatinos. If you choose “Manual,” then Mail never checks unless you hit the “Sync” button. Mail can even dynamically manage how often new mail is downloaded based on your usage.

  • Always download full message and Internet images: Instead of fetching an entire message, clear the “Always download full message and Internet Images” checkbox. This will let you view small previews of your incoming messages, so that you can navigate your inbox more efficiently. If you have a slow internet connection or want to reduce your data usage, then this option might be useful to you.
  • Download email from: How far back do you want your mail collection collected? If you have a phone or tablet, then you might want to limit the number of messages stored in the Mail app. “The last month” option is a good choice and enough for day-to-day usage.

  • Sync Options: Here you’ll see three items: Email, Calendar, and/or Contacts. Toggle the items you wish to sync with your account on or off. If you’re facing any sync related issues, click on “Advanced mailbox settings” to configure the Incoming email server, Outgoing email server, Calendar server, and Contacts server.
Web Hosting