Make sure you subscribe to it on a blackberry phone,
Use it to browse with that blackberry for some minute before you remove the SIM,
Then Insert that SIM to your Android phone.
Configure the APN of your Android phone with blackberry.net and activate it as your default setting.
Switch on your data connection (H won't display yet).
Off your Android phone again and remove the SIM (make sure the APN is set to blackberry.net ). - See more at: http://www.360techgates.blogspot.com/2016/05/get-glo-bis-3gb-of-1k-and-enjoying.html#sthash.WXQSFoo4.dpuf
If you have your PC set up as a living room gaming PC and media center, why use a mouse for everything when you could just use your game controller? By default, Xbox controllers work well with many PC games, but it won’t allow you to navigate the desktop and play something from Netflix. But with some third party software, you can use an Xbox 360 or Xbox One controller as a mouse and keyboard. If you have one of Valve’s Steam... - See more at: http://www.360techgates.blogspot.com/search/label/Gaming#sthash.OcCTFaFV.dpuf
How to Play DVDs and Blu-rays on Linux Commercial DVDs and Blu-ray discs are encrypted. The Digital Rights Management (DRM) is designed to prevent you from ripping them, copying them, and watching them on unsupported players. - See more at: http://www.360techgates.blogspot.com/search/label/Learn%20Hack#sthash.J8yncvsL.dpuf
To my surprise there are some people who may not know that don't know how to get more followers on twitter,like 1000+ followers in a day but i will teach you today how to get more followers non-chalantly as long as you have an internet connection you are good to Go.
Over-the-air updates have long been the bane of many rooted Android users’ existences. It’s an endless battle: installing the update breaks root or won’t flash at all, but everyone wants the latest version of their mobile OS. Thanks to a new tool called FlashFire, the struggle may be over.
If you have your PC set up as a living room gaming PC and media center, why use a mouse for everything when you could just use your game controller?
By default, Xbox controllers work well with many PC games,
but it won’t allow you to navigate the desktop and play something from
Netflix. But with some third party software, you can use an Xbox 360 or
Xbox One controller as a mouse and keyboard. If you have one of Valve’s
Steam controllers, it’ll work as a mouse and keyboard on your desktop
with no additional tweaks required.
Xbox Controllers Require Additional Software
Microsoft doesn’t include this feature by default for Xbox
controllers, so you’ll need a software program that can make an Xbox
controller function as a mouse and keyboard. Thankfully, there are a
number of options. Gopher360
is a free and open source one, and it works without any additional
configuration. The other applications here require some setup.
Just download and run Gopher360. It’s a lightweight application that
“just works” when you run it. Use the left-stick to move the mouse
cursor, press the “A” button to left-click, and press the “X” button to
right-click. The Gopher360 website lays out the key configuration in more detail.
If you want to use the Windows on-screen keyboard with it, you’ll
need to right-click the Gopher360 application and select “Run as
Administrator.” You can then use the Windows on-screen keyboard to
type. To make it always run as administrator, you can right-click the
Gopher.exe file, select “Properties,” select the “Compatability” tab,
and activate the “Run this program as an administrator” option.
To launch the on-screen keyboard in Windows 10, you can right-click
the taskbar and select “Show touch keyboard button.” You’ll then see a
keyboard icon near your system tray. Click it using the controller and
you’ll get an on-screen keyboard you can use for typing. It’s not ideal
for large amounts of typing, but could come in handy if you want to
quickly search Netflix for something.
Gopher360 will only function while it’s running and open in the background. To ensure it’s always functioning, you can place the Gopher.exe file in your computer’s Startup folder. Windows will automatically run when you log in.
Gopher360 isn’t your only choice, but it is our favorite. If you want to try something else, though, both JoyToKey and Xpadder
are advanced game controller configuration tools, and each can be used
to make the controller function as a mouse and keyboard. However, they
require configurations and profiles, so they’re not quite as
plug-and-play. JoyToKey is also shareware, so it’s not completely free.
If you’re willing to spend a bit of money, you might want to try Controller Companion,
which is well-reviewed on Steam and costs $2.99. Designed for use with
Xbox 360 and Xbox One controllers, it’ll make your controller function
as a mouse on the desktop. More interestingly, it includes a custom
on-screen keyboard that some people might find more efficient than the
native Windows on-screen keyboard.
Steam Controllers Just Work
If you have one of Valve’s Steam controllers, it will natively
functions as a mouse and keyboard. As long as you have it connected to
your PC, you can just use it on the windows desktop.
The right touchpad on the controller moves the cursor–you can even
flick your finger across the touchpad and the cursor will continue
moving. The right shoulder button performs a left-click, and the left
shoulder button performs a right-click. This sounds like the opposite of
what it should be, but the right shoulder button is in the most
convenient location, so it makes sense.
Other buttons also perform convenient actions. For example, the left
touchpad functions as a scroll wheel, while the joystick functions as
up, down, left, and right arrow keys.
You can actually adjust all these controls yourself. To do so, open
Steam’s Big Picture mode interface, select the “Settings” cog button
in the top-right corner of the screen, select “Configurations” under
Controller, and select “Desktop configuration.” You can tweak your
settings from here like you’d tweak the Steam controller’s profiles to work with any game.
Unfortunately, there’s no way to open Steam’s on-screen keyboard, as
it’s part of the Steam overlay. But you can use the Windows on-screen
keyboard, just as you’d use it with an Xbox controller.
There’s really no subsitite for a keyboard and mouse for heavy PC
use, but having a controller function as a basic mouse and keyboard is
great for some basic Netflix or other video-playback and web-browsing in
your living room. It’s a shame support for using Microsoft’s own Xbox
controllers on the Windows desktop isn’t just built into Windows, but
with the right software, you’ll be up and running in no time.
The Lord of the Rings is easily my favorite movie of all time. (Which one, you ask? All three, obviously.) But the latest Blu-Ray collection has one glaring problem.
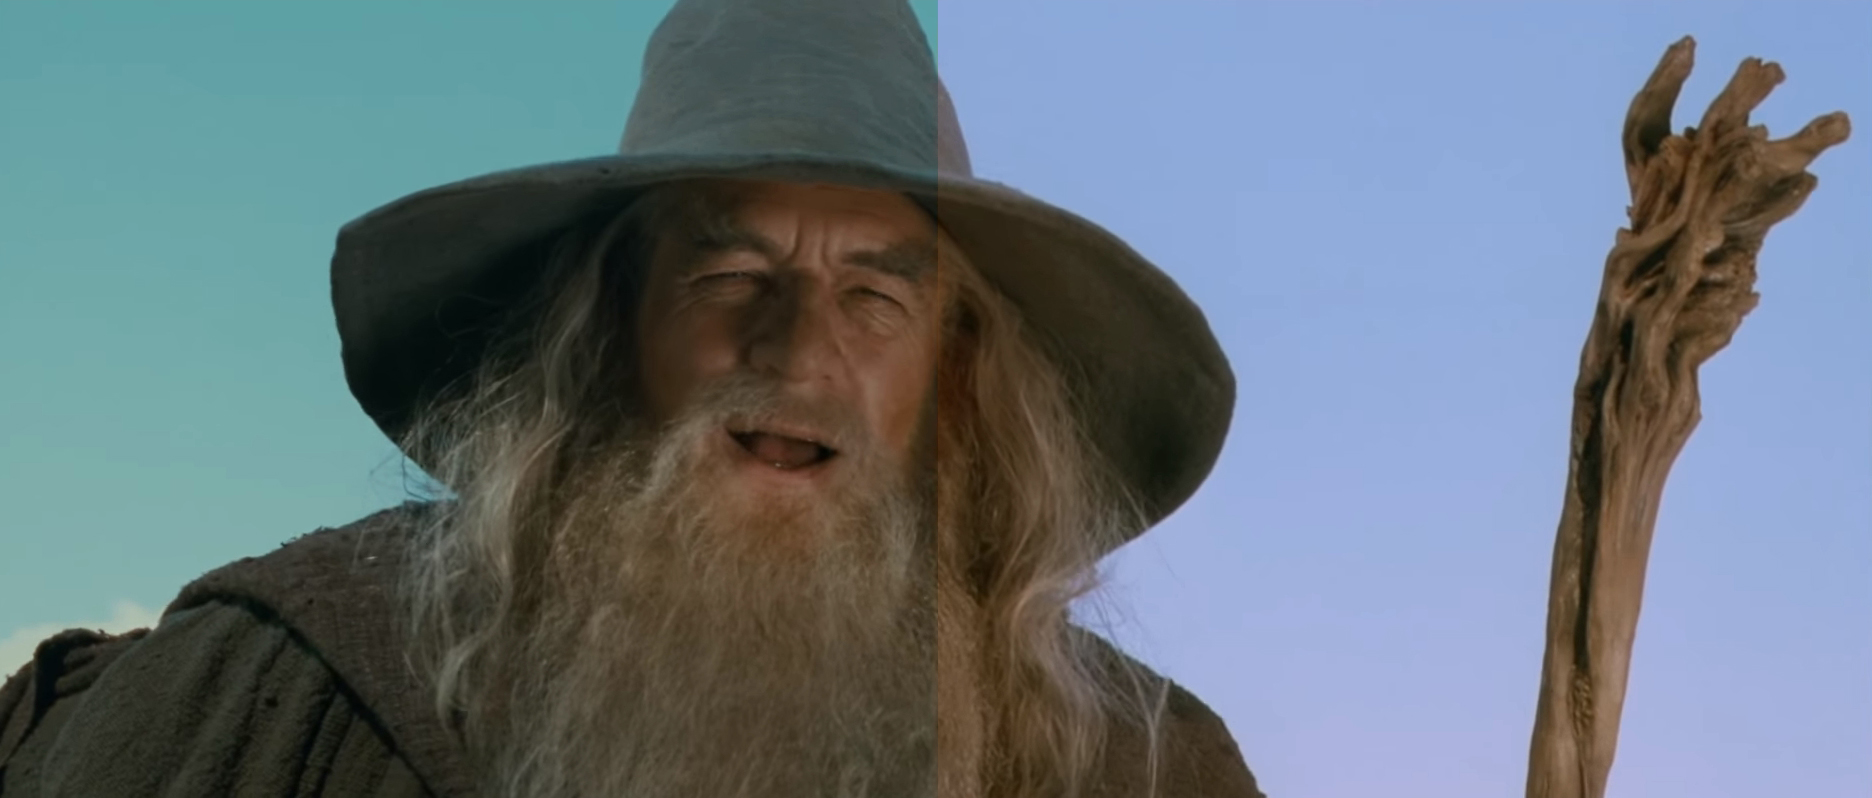
The Blu-Ray version of the Fellowship of the Ring: Extended Edition has a significantly altered color timing, resulting in a green hue across the entire movie. It only exists in Fellowship of the Ring, only in the Extended Edition, and only on Blu-Ray. The extended DVD version ofFellowship does not have this problem, nor does the theatrical Blu-Ray version of Fellowship, nor do the other two Extended Edition Blu-Rays. Check out the video below, which comparesFellowship’s Extended and Theatrical Blu-Rays, to see what the change looks like (watch it in full screen, trust me). You can read more about the green tint issue here.
Thankfully, there is a fix. Editing master You_Too (the same person who did the color correction on the fantastic Star Wars: Despecialized Edition) wrote an AviSynth script to fix some of the more glaring color issues. His solution, however, only exists in a buried forum post and a now-dead blog post that, if you aren’t versed in AviSynth and other tools, may sound like Chinese. So I figured I’d put together a little how-to that explains a) how to run the script, and b) improves on it in a couple small ways. But to be clear: 99% of the credit for this process goes to You_Too and his hard work. I just added a small tweak here and there.
What You’ll Need
To perform this process, you’ll need to grab a few tools:
A Windows PC (I imagine this is possible on other platforms, but I haven’t looked into how to do it.)
MKVToolNix to merge the resulting files into one movie (I recommend downloading the portable version.)
That seems like a lot, but don’t worry, everything has a purpose, and it will all come together in the steps below. Just save all these files to your desktop for now.
Step One: Rip Your Blu-Ray Discs
Before you start the color correction, you’ll need to rip the movie to your computer. So hook up your Blu-Ray drive and install MakeMKV before continuing.
Start MakeMKV, insert Disc One of the movie, and press “Open Disc”. When it’s done reading the disc, pick the title, language, and subtitles you want to rip. The title you want is the largest one, and you’ll definitely want the main DTS English audio (some may want the full DTS-HD MA audio as well, and that’s fine–I generally only rip the 5.1 DTS “core” to save space). I also recommend checking the first four subtitle boxes, as shown above. This will include English subtitles for the whole movie, and English subtitles just for the Elvish parts. If you just want subtitles for Elvish lines, select the second set of checkboxes.
With those settings selected, your window should look exactly like this:
Next, choose your output folder on the left-hand side and press the “Make MKV” button. It’ll take awhile to rip, but when it’s done, you’ll have a big ol’ MKV file on your hard drive–with the first half of the movie. Rename it to FOTR-D1.mkv and put it in a folder wherever you want. I created a folder on my desktop called “LOTR Re-Color”, where I recommend storing all the video files, audio files, and scripts you end up creating for this project.
Repeat this whole process for Disc Two, and name the resulting file FOTR-D2.mkv. You can get started on Step Two below while the discs are ripping.
Step Two: Set Up AviSynth and Its Plugins
You’ll need to install a couple programs and plugins before going through the rest of this process, so let’s do that now.
If you haven’t already, download AviSynth, MeGUI, GiCocu, the Dither package, the MaskTools package, RemoveGrain, and MKVToolNix from the links in the “What You’ll Need” section of this guide.
First, install AviSynth. It’s a normal Windows program, so just double-click the EXE file and follow the prompts to install it to your system.
MeGUI and MKVToolNix are portable applications, which means you don’t need to install them–just unzip the files to any folder you want (I created folders called “MeGUI” and “MKVToolNix” in my “LOTR Re-Color” folder from Step One).
GiCocu, Dither, MaskTools, and RemoveGrain are all plugins for AviSynth that come packaged in ZIP files. Open each ZIP file, and extract the following files into AviSynth’s plugins folder (by default located in C:\Program Files (x86)\AviSynth\plugins):
GiCoCu.dll (from the GiCoCu ZIP file)
dither.avsi (from the Dither ZIP file)
mt_xxpand_multi.avsi (from the Dither ZIP file)
dither.dll (from the win32 folder in the Dither ZIP file)
avstp.dll (from the win32 folder in the Dither ZIP file)
mt_masktools-26.dll (from the MaskTools ZIP file)
RemoveGrainS.dll (from the RemoveGrain ZIP file)
The final folder will probably look something like this:
Those should be the only plugins you need for this process, along with what’s already in AviSynth’s plugins folder.
Step Three: Create Your Scripts
You’ll need to create four text files for this process: a “Curves” file, which holds the color correction information; an AviSynth script, which runs the commands; and two “qp files”, which will help us remove the pause in the middle of the movie.
First, open Notepad and paste in the following text:
Save the file as FOTR-D1.avs in the same folder as the movie files.
Now, create a new script with the exact same text, but with FOTR-D2.mkv in the first line instead of FOTR-D1.mkv. Name the script FOTR-D2.avs, and put it in the same folder as the movie files and other scripts.
Lastly, create two new text files: one called D1-pause.txt and one called D2-pause.txt. D1-pause.txt should contain the following:
151969 K
And D2-pause.txt should contain this text:
48 K
This will create “keyframes” at the end of Disc One and the beginning of Disc Two, so we can remove the five second pause in between the two halves of the movie.
At this point, here’s what my project folder looked like with everything in place:
Make sure you have all of these files before continuing.
Step Four: Run the Scripts
Open MeGUI.exe and, on the AviSynth Script line at the top, click the “…” button. Choose the FOTR-D1.avs script you created in the last step and click OK. If all goes well, a video preview window should open, showing you what the resulting video will look like. You can close this window.
If, instead of a video preview, you get an error, make sure the correct plug-ins are installed and that you did everything else correctly up until this point.
On the “Video Output” line of MeGUI’s main window, rename the output file to FOTR-D1-CC.mkv(or whatever you prefer). DO NOT overwrite or delete the original FOTR-D1.mkv file; we will need it later!
Then, click the Config button on the “Encoder Settings” line. Change the Target Playback Device to “DXVA”. In the Quality box, type 16.5 and set the Preset to Medium. You can set the quality to a slightly higher number for a smaller file, but 16.5 is what I found to be the best balance between quality and file size (and will fit perfectly on a 25GB Blu-ray disc when we’re done). Click OK.
Lastly, check the “Show Advanced Settings” box, and go to the “Misc” tab that appears along the top of the window. Check the “Use qp File” box, and press “…” to browse to the first qp file we created in the last step (D1-pause.txt).
Click the OK button to return to the main MeGUI window.
Now it’s time for the main event! Click the “Queue” button in the top half of the window–the one next to the “Queue Analysis Pass” button–to start the encoding process.
This will take awhile (on my overclocked six-core i7, it took a little over three hours, so on typical machines it’ll take even longer). Go take a break, grab a cup of tea, and let it do its thing. You can also continue using your computer during this time if you want.
When it’s done, repeat all of step four using FOTR-D2.avs and D2-pause.txt. Note that the resulting files will not have any audio–that’s okay, we’re going to fix that in the final step.
Step Five: Merge the Files Into One Movie
At this point you should have four video files:
FOTR-D1.mkv (Disc One’s original video and DTS audio)
FOTR-D1-CC.mkv (Disc One’s color corrected video, with no audio)
FOTR-D2.mkv (Disc Two’s original video and DTS audio)
FOTR-D2-CC.mkv (Disc Two’s color corrected video, with no audio)
Now it’s time to merge them all together into one beautiful movie.
Open mkvtoolnix-gui.exe and click the “Add Source Files” button. Select FOTR-D1-CC.mkv. Then press Add Source Files again and select FOTR-D1.mkv. You should see both files show up in the top pane, and all the different tracks (video, audio, subtitles, and chapters) in the bottom pane.
Click on the second subtitle track, and in the right-hand pane, set “Default track flag” and “Forced track flag” to “Yes”. This ensures the elvish subtitles always show up when you watch the movie.
Next, right-click on FOTR-D1-CC.mkv in the top pane and choose “Append Files”. Select FOTR-D2-CC.mkv. Then, right-click on FOTR-D1.mkv, choose “Append Files” again, and select FOTR-D2.mkv.
Uncheck Disc One’s original video in the bottom pane (both checkboxes). We don’t want that in our final movie–we just want its audio and other stuff.
At this point, your window should look like the screenshot above.
Now, click the “Output” tab along the top, and click on the “Split Mode” dropdown. Choose “by parts based on timecodes” and enter the following into the box:
00:00:00-01:45:37,+01:45:45-03:48:18
You can also change the File title if you like.
Lastly, give the resulting movie a filename in the Output File box at the bottom of the window. I used like FOTR-FINAL.mkv.
When everything is ready, click the “Start Muxing” button. It will combine the color corrected video and the original audio for both discs into one 208-minute epic.
Step Six (Optional): Burn the Color Corrected Movie to a Blu-Ray Disc
I use a home theater PC for all my movie watching, so if you’re like me, you can stop here. Just open the final MKV file in your favorite video player, and you’re done.
However, if you want to watch the movie on a Blu-Ray player (and your Blu-Ray player doesn’t support a thumb drive with video files), you can burn your finished, color-corrected movie to a Blu-Ray disc. With the recommended settings in this post, it should be the perfect size for a 25GB Blu-ray. You’ll just need a Blu-Ray burner, some blank discs, and two free programs: tsMuxeR and ImgBurn.
Unzip tsMuxeR wherever you want (it’s portable, just like MeGUI and MKVToolNix) and install ImgBurn like a normal Windows program. Next, launch the tsMuxeR GUI. Click the “Add” button in the upper right-hand corner and add your FOTR-FINAL.mkv video to the project. Under Output, select “Blu-ray ISO”, and click “Browse” next to the File Name box to select a location on your hard drive. Click the “Start Muxing” button to create the Blu-ray image.
When it’s finished, open ImgBurn and select “Write Image File to Disc”. Under Source, click the Browse button and select your newly-created ISO. Insert a blank Blu-ray disc and click the big Write button.
When it finishes, pop the disc in a Blu-ray player and fire it up. If all goes well, it should start playing movie right away. Enjoy!
What This Script Does (and How I Altered It)
The information in this section isn’t necessary to perform the above steps, but if you’re curious what’s happening in this process, here’s an explanation of each line in the script.
The first line of the script, DirectShowSource("FOTR-D1.mkv", selects the video AviSynth will use as a source. You_Too’s original script used the mt2s file from the Blu-Ray, but I ripped it as an MKV, since it’s a little easier. So that line has been slightly altered.
The next few lines of the script are the actual color correction, and remain unchanged from You_Too’s original script. You can read You_Too’s forum post for information on how he found the ideal curves in Photoshop, but here’s his explanation of what that portion of the script does:
First [the script] applies the curves, then reduces yellows by 5%, greens by 10% and shifts cyan towards blue and reduces it’s saturation by 20%. This removes a bit of the oversaturation-look of yellow and neon-green, and makes the movie look less cyan-tinted in certain parts, with skies and water looking more natural. (Don’t expect colorimetric precision though, since this film has already been badly recolored!)
Next, You_Too added a Blur(0.4) line, which I removed for my script:
It adds a very slight blur (almost not noticeable) to reduce the oversharpening which for no reason appears randomly throughout the movie.
You can add it back in if you want, just under the Tweak lines.
The crop( 0, 140, 0, -140) line does just what it sounds like:
Finally, it crops the black borders since they actually have colored artifacts in them which is brightened by the other adjustments.
I made one other change to the script at the end. In order to use GIMP curves, You_Too had to convert the video from YUV12 to RGB, apply the curves, then convert it back to YUV12 (as you can see in lines 2-4 of the script). Unfortunately, converting between YUV12 and RGB naturally creates some pretty awful color banding in gradients, which is very noticeable in certain scenes of Fellowship. But, that conversion is a necessary step in this script, which means I couldn’t just remove it.
So, with the help of a few extra plugins, I added some dithering to fix the problem (represented by the Gradfun3(thr=1.3) line at the end of the script). Now, scenes with gradients look much more like the original Blu-Ray.
Lastly, I added the two qp files to the process, which remove the pause in the middle of the movie (where you’d switch from Disc One to Disc Two). The qp files tell AviSynth to turn the named frames–in this case, frame 151969 from Disc One and frame 48 from Disc Two–into “keyframes”. When we split by timecode in MKVToolNix in Step Five, it will look for the nearest keyframes at those timecodes, and split it at those points. 151969 is the first frame of Disc One’s black pause, and frame 48 is the first frame of the movie after Disc Two’s black pause. With that pause out of the way, the movie will go straight from one scene to the next, as in the one-disc theatrical version.
If you have any issues with your final video not removing the pause correctly–either including some of the pause or cutting off part of the movie in the middle–try different frames here to see if it works. I had some weirdness in getting mine to work, but these frame numbers should, intheory, work for everyone going through this process.
Like the Roku and Chromecast, Sony’s PlayStation 4 can play video and music files from a USB drive or another computer on your network. Your PS4 can even play local music files in the background while you play a game.
This is thanks to the “Media Player” app, which Sony added more than a year and a half after the PS4 was released. There’s also a now-free-to-use Plex app for streaming videos from another one of your PCs.
Supported File Types and Codecs
Here’s a list of different video and audio codecs the PlayStation’s Media Player understands,straight from Sony. If you want to play a media file on your PlayStation, it must be in these file formats. If it isn’t, you’ll need to transcode it to a supported one before it will function on your PlayStation.
Music files can be in MP3 or AAC (M4A) formats. Photos can be in JPEG, BMP, or PNG formats. Video files must be in one of the following formats:
MKV
Visual: H.264/MPEG-4 AVC High Profile Level4.2
Audio: MP3, AAC LC, AC-3(Dolby Digital)
AVI
Visual: MPEG4 ASP, H.264/MPEG-4 AVC High Profile Level4.2
Audio: MP3, AAC LC, AC-3(Dolby Digital)
MP4
Visual: H.264/MPEG-4 AVC High Profile Level 4.2
Audio: AAC LC, AC-3 (Dolby Digital)
MPEG-2 TS
Visual: H.264/MPEG-4 AVC High Profile Level4.2, MPEG2
These are some of the most common video file types, so you may not need to worry about it at all.
Use the Correct File System on Your USB Drive
To double-check, right-click the drive in Windows and select “Format.” Format it to use the exFAT file system if it’s currently using NTFS. This will erase all files currently on the drive, so back up any files you care about before doing this.So you have the right files–now it’s time to get them to your PlayStation. To get started, plug a USB drive into your computer. The drive must be formatted with either the exFAT or FAT32 file system, as the PlayStation 4 can’t read NTFS. If your drive is formatted with the NTFS file system, you’ll see an error after you connect it to the PlayStation 4. It just won’t appear or be usable.
You Must Place Your Media Files in Folders
Sony doesn’t mention this anywhere, so we bumped into this problem ourselves. If you just have a video file and dump it into the “root” folder of your USB drive, the PlayStation 4 won’t see it. Your files must be located inside a folder on the drive or your PS4 won’t be able to use them.
Audio files must be located in a folder called “Music” on the drive for the PS4 to detect them correctly. Video files can be in any folder, but they need to be in a folder and not on the root of the drive. You could put them in a folder named “Videos”, or create separate folders for different types of videos. LIkewise, photos must also be stored in folders if you want to view them, but any folder name will do.
Use the PS4 Media Player
Once you’re done, you can “safely remove” the USB drive from your computer and plug it into one of the USB ports on your PS4 — there are a few located on the front that are usually used for charging your controllers. Launch the PS4 Media Player app and your USB drive will appear as an option.
You’ll see the PS4’s “Media Player” app icon in the PS4’s “content area” — that strip of icons on the main screen. Select it with your controller and launch it. If you haven’t installed the media player app yet, the icon will still appear here, but it’ll take you to the PlayStation Store where you can download the app for free first.
Select your USB drive, browse to the music or videos you want to play, and use the buttons on the controller to control playback.
While playing a video, you can press the L2 and R2 shoulder buttons to rewind and fast forward. Press the “Options” button to open a playback control panel, and press the triangle button to view information about the file.
When playing music, you can hold down the PlayStation button while in a game to access the quick media player controls, allowing you to quickly skip songs and pause playback.
Alternatively: Use a DLNA or Plex Server
If you don’t want to connect USB drives directly to your PS4 and ferry media files back and forth that way, you can stream videos and music from a DLNA server to your PlayStation 4. The PS4 Media Player app will detect compatible DLNA servers on your home network and offer them as options right alongside any connected USB devices when you open it
Use our guide to setting up a DLNA media server if you want to go this route. However, if you’re looking at streaming over the network, Plex is a more full-featured solution you might want to look at. Plex recently became free-to-use without a “Plex Pass” subscription on the PlayStation 4.
There’s no risk that Katniss Everdeen, the warrior who has led the charge against oppression in “The Hunger Games” movies, can ever return to her current incarnation. Even if she and her world are rebooted back into franchise existence by a ravenous studio, her moment was now. Katniss, as played by Jennifer Lawrence over three years and four blockbusters, has evolved from a backwoods scrapper in the first movie into a battle-scarred champion and an exemplar of female power on screen and off — and the battles she’s fought have extended far beyond the fictional nation of Panem.
So, yes, of course Katniss is back, just as promised by the clumsy title of her last movie, “The Hunger Games: Mockingjay Part 1.” In “Part 2,” she has returned as destined to finish the fight, defeat the enemy and send off a big-screen series that has had an astonishing run both in cold-cash terms and in its meaningful symbolism. She’s ready. Since 2012, when the first movie landed, Katniss has grown into her role as a savior, an evolution that parallels that of Ms. Lawrence, who entered the series as a Sundance starlet and leaves it as one of the biggest stars in the world. Both have grown exponentially, rising to the demands of their loving audience.
And “The Hunger Games” has triumphed partly because it means so many different things to so many people. It’s a story of war and peace, love and bullets, pegged to a girl-woman who fights for her family, her friends and the future. It’s aspirational and inspirational, personal and communal, familiar and strange, and it speaks to the past as well as the present, sometimes unnervingly so. Suzanne Collins, who wrote the books, took her cues from reality television, the Iraq war, Roman gladiator games and the myth of Theseus and the Minotaur, and then filtered her influences through a heroine who embodies the adage that it’s better to die on your feet than live on your knees. The result was a great character on the page and a transcendent one on the screen, where women tend to be sidelined or trapped in the virgin-whore divide.
If Katniss escaped that old binary it’s because Ms. Collins created a character who exists outside the traditional confines of the feminine-masculine split, and because the movies have stayed true to that original conception. At once a hunter and a nurturer, Katniss is tough and teary, stoic and sentimental, which give her layers that reflect her changeable inner states as well as her public and private identities as daughter, sister, lover and leader. It’s instructive that she’s worn her most overtly glamour-girl outfits as part of the farcical role forced on her by the totalitarian government that rules Panem, having been dolled up with makeup and smiles for the televised sideshows that accompany the murderous games of the series title. She’s since graduated to basic battle black or unisex clothing that’s suggestive of a Dystopian Gap.
Photo
Jennifer Lawrence seems to be playing a version of her “real self” as Katniss Everdeen.CreditMurray Close/Lionsgate
“Part 2” more or less picks up where the last movie left off, with Katniss and the rest of the rebel forces closing in on the government and Panem’s leader, President Snow (the invaluable Donald Sutherland, leading with an insouciant self-amused smile). There are no real surprises, though many familiar faces, some of whom (Jeffrey Wright and, more movingly, Philip Seymour Hoffman) flash by so quickly that they feel like guests who have popped in only to say goodbye. As with a lot of contemporary franchises, this one stocked the supporting roles with veterans who have given ballast to a largely unmemorable young cast, including the insipid twosome — Josh Hutcherson as Peeta and Liam Hemsworth as Gale — who have wanly bookended Katniss from the start.
Photo
Donald Sutherland as President Snow in “The Hunger Games: Mockingjay Part 2.”CreditMurray Close/Lionsgae
Like the previous two movies, “Part 2” was directed by Francis Lawrence who, like most franchise filmmakers, was not hired for the quality of his mise-en-scène but for one job: to not screw up an extremely valuable property. (The first was shepherded by Gary Ross, whose cinematographer, Tom Stern, alas, also departed the series.) And, so, mission accomplished, largely with a lot of conversational face-offs and regular bursts of showy violence that sometimes turn panoramic, allowing you to admire the scale of the apocalyptically dressed sets. To that instrumental end, the actors hit their marks while running and gunning amid the gray rubble and black ooze, although Mr. Lawrence does raise some nice shivers in a tunnel sequence, making the horrific most out of the dark.
Photo
Josh Hutcherson as Peeta Mellark in “The Hunger Games: Mockingjay Part 2.”CreditMurray Close/Lionsgate
“Part 2” looks much like most contemporary dystopian future worlds, one that’s by turns similar enough to ours to be reassuring and different enough to be diverting. What makes the material still feel personal — other than the yearslong investment and love that transform entertainments into fan communities — is the combination of Katniss and Ms. Lawrence, who have become a perfect fit. Ms. Lawrence now inhabits the role as effortlessly as breathing, partly because, like all great stars, she seems to be playing a version of her “real” self. It’s the kind of realness that can give you and the movie a jolt, as in a scene with Ms. Lawrence and a sensationally raw Jena Malone that thrusts it into that place where heroes and villains give way to something like life.
Photo
Liam Hemsworth as Gale Hawthorne in “The Hunger Games: Mockingjay Part 2.”CreditMurray Close/Lionsgate
It’s crucial to the conception of Katniss that most of the character’s more emotionally plangent scenes have been with other women, including her family, friends and other Hunger Games combatants. Some of this can be chalked up to casting and, together with Ms. Lawrence, Ms. Malone, Natalie Dormer, Patina Miller and Michelle Forbes make one of the toughest groups of women to band together on screen since Quentin Tarantino’s “Death Proof,” his ode to exploitation cinema and its chicks. This series has had its share of robust male assistance (notably from Mr. Sutherland and Woody Harrelson), but it’s been distracting and at times more than a little amusing that Katniss’s love interests are played by the blindingly bland brotherhood of Mr. Hutcherson and Mr. Hemsworth.
Intentional or not, their casting ensured that in the movies, just as in the books, Katniss was never going to be upstaged by a love interest. “The Hunger Games” may have shocked readers and viewers with its child-on-child violence, but even more startling and certainly far more pleasurable has been the girl-woman at its center who can lead troops like a reborn Joan of Arc, yet find time to nuzzle the downy lips of her male comrades before returning to battle. Her desire is as fluid as her gender, whether she’s slipping into froufrou, shooting down enemy aircraft, kissing a boy or taking a punch. Unlike a lot of screen heroines, she has never settled into stereotype, which, despite the whole dystopian thing, makes her a lot like the contemporary girls and women watching her.
That has helped make Katniss the right heroine for these neo-feminist times, the you-go-and-fight girl who has led the empowerment charge at the box office and in the public imagination, often while slinging a bow and arrow borrowed from Diana, the Roman goddess of the hunt. It wasn’t long before Katniss was making more like a latter-dayAthena, the Greek goddess of war, even as this very human girl-woman was also suggesting a vibrant new take on the American Adam. You may not know the name, but you know the type: He’s the hero whom the critic R. W. B. Lewis, in his 1955 study of 19th-century literature (and an “American mythology”) described as being “emancipated from history, happily bereft from ancestry, untouched and undefiled by the usual inheritances of family and race.”
However mythic this figure — individual, self-reliant, “fundamentally innocent” — the illusion of freedom he enjoys is meaningful, Lewis argues, because it makes for fiction capable of “profound tragic understanding” rather than hopelessness. Even inadequately, this Adam struggles because, as with his biblical namesake, “the world and history lay all before” him; by contrast, these lay all behind Katniss, who has endured history, violence and death. Yet she goes forth into her world because she too has an illusion of freedom, one which has spared us the nihilism polluting too many movies and has meant that she is neither Adam nor Eve but something else. And it is only by being this something else (not the Girl, not the Virgin or the Whore) that she has been able both to love and to fight, including against the big bad patriarch.
The success of “The Hunger Games” series has been itself, in its bottom-line fashion, a rejoinder to another intolerant regime, that of a movie industry that continues to treat women on and off the screen as a distraction, an afterthought and a problem. A few months into its run, the second installment, “Catching Fire,” became the first movie with a lone female lead to top the annual domestic box office in four decades. That’s astonishing because it reveals the historical depths of the industry’s inequities even while it speaks to the audience’s embrace of this series. There are all sorts of reasons that viewers have flocked to these movies, including the studio hard sell, but I like to think the numbers prove that, in rallying to Katniss’s side, they’re also backing the other liberation struggle she has come to represent.


![NG-[A_BA[COMP_LAPT_ALLB]:Laptops_728x90](https://lh3.googleusercontent.com/blogger_img_proxy/AEn0k_s31N4oJpMXaFyqyWdmmyLpl29R8t-xSjYnKrmSakgLoiatkzqYAQx6gei4hMZKr2USwfoUTe4usSbOk48Sey3PBFFcmMEM-WUViKZ4WDB3ifPpGV_mQGitdTmnM3G9voo1ORxVjhfzJ-BeBJ8Vt5P2g7Giomah7ybRBZ7sDDBCZKsPPR6o=s0-d)




 There’s no risk that Katniss Everdeen, the warrior who has led the charge against oppression in “The Hunger Games” movies, can ever return to her current incarnation. Even if she and her world are rebooted back into franchise existence by a ravenous studio, her moment was now. Katniss, as played by


